Septal implantation technique for RV lead
Septal Implantation of Right Ventricular Lead
Septal Implantation of Right Ventricular Lead : Technique
Right ventricular pacing lead provides critical pacing in situations of life-threatening brady-arrhythmias – hence from a purely rhythm maintenance point of view, the most critical lead of a pacing system is the right ventricular lead. As discussed in the previous section, there are two methods of implanting an RV lead : Apical implantation and septal implantation. The technique of septal implantation is described here.
The author’s default preferred method is septal pacing.
The goal of septal pacing is to facilitate simultaneous activation of both ventricles. However, as the lead is implanted in the right ventricular aspect of the inter-ventricular septal myocardium, activation of LV depends on the speed of the spread of electrical activity via the septum to the LV myocardium. This is in contrast to the native state where Purkinje fibers ensure rapid conduction to the ventricles. Therefore septal pacing is NOT equivalent to His bundle pacing. However, via the septal muscle, the purkinje system fibers (or the bundle branches ) get activated and can hasten activation of the LV. The best surrogate marker for simultaneous bi-ventricular capture is the paced ECG morphology. If the ECG shows narrow complex capture – one can assume that the ventricles are getting captured simultaneously or at least that there is no significant delay between the LV and RV. (In contrast, standard apical pacing produces a wide LBBB on the ECG)
The technique described here is what the author has learned and practiced at this training institution. It is based on the method described and advocated by Harry G Mond using a three dimensional stylet. The end goal is to pace the lead at the inter-ventricular septum at its mid point to ensure a narrow as possible paced QRS complex by delivering the impulse near simultaneously to the RV and LV
The “mid-septal position” needs further emphasis : This location is the ideal place to capture both ventricles at the same time (hence narrow QRS complex). Too anterior (towards the apex) could lead to capture similar to RV apcial capture. Too proximal (i.e. just beyond the tricuspid valve annulus), may have lead stability issues or may entrap a tricuspid leaflet leading to significant regurgitation. If it is too high, it will predominantly pace the RVOT with delayed exit to the LV and sometimes causing symptoms of palpitations similar to RVOT ectopics. If it is too low, it will be similar to RV apical pacing with basal to top activation
The goal is to achieve a narrowest possible paced QRS complex with acceptable lead parameters. Therefore a combination of radiographic and paced ECG mapping is utilized to get to the ideal mid-septal position.
The steps are
- Crossing the tricuspid valve (and ideally drag down the lead from the RV outflow tract)
- Placing the lead tip opposed to mid portion of the interventricular septum using the 3D stylet and radiologic guidance
- Confirming position and parameters electrically (ECG morphology)
- Deployment of the screw to fix the lead & reconfirm parameters
Although the lead is usually 6Fr thick, it is an extremely floppy structure compared to other coronary and vascular catheters. This floppiness facilitates placement of the lead in challenging positions during implantation and after implantation free movement of its body within the vascular space. The downside of this floppiness is that, lead placement requires the use of stiff metal stylets to guide the lead to the desired position.
The active fixation ventricular lead pack comes with several metal stylets of varying hardness and they are usually straight ones but some contain a J shaped stylet in addition to straight ones. This J curved stylet can be used to facilitate lead crossing through the tricuspid valve.
When stylets are inserted to the lumen they should be well wetted with heparinized saline to prevent clot formation in the lumen. The operator should take care to clean his gloves free of blood when handling stylets for the same reason. This has profound implications for future lead extractions as the lead lumen needs to be kept patent for potential future lead extractions. Therefore all effort to avoid blood and debris on the stylets should be taken during lead implantation
Manipulating the RV lead through the tricuspid annulus requires dexterity, thoughtful approach and most importantly patience.
A gently curved stylet as follows which conforms to the RV cavity can facilitate crossing the TV. Our preferred approach is to make a three dimensionally curved stylet and use it to guide the lead because in vast majority of cases valve crossing and correct lead placement can be achieved in a single pass using this stylet.
Shaping the 3 Dimensional Stylet
The stylet that is used to guide the lead to the mid septum has two curves : The first large curve facilitates crossing the tricuspid valve aiming upwards towards the RV mid cavity (instead of the apex) and the small curve at the end makes the lead point towards septum instead of the free wall.
If one takes time to appreciate the shape of the stylet in anatomical orientation it’s extremely easy to figure out its usefulness.
The curves are constructed by drawing a pre-wetted (heparinized saline) straight stylet over wet gauze swab or artery forceps as demonstrated below.
( a custom pre-formed 3D stylet is available commercially – we do not have it nor is it necessary to use one as hand made curves are the best to individualize implantation for each patient. Further, skill in making the stylet is valuable when faced with difficult anatomy)
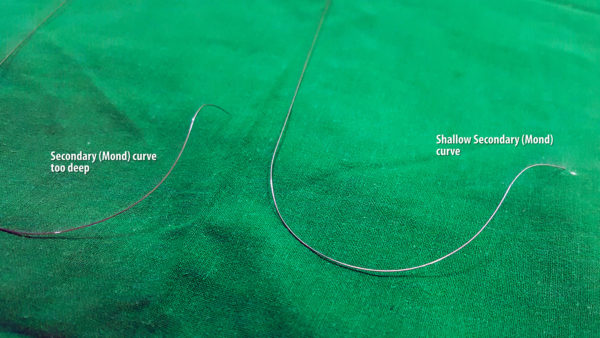
Figure : 3 Dimensional Stylet : The stylet has two curves – large curve and small curve. The large curve facilitates crossing of the tricuspid valve to enter the RV and small distal curve facilitates septal pacing
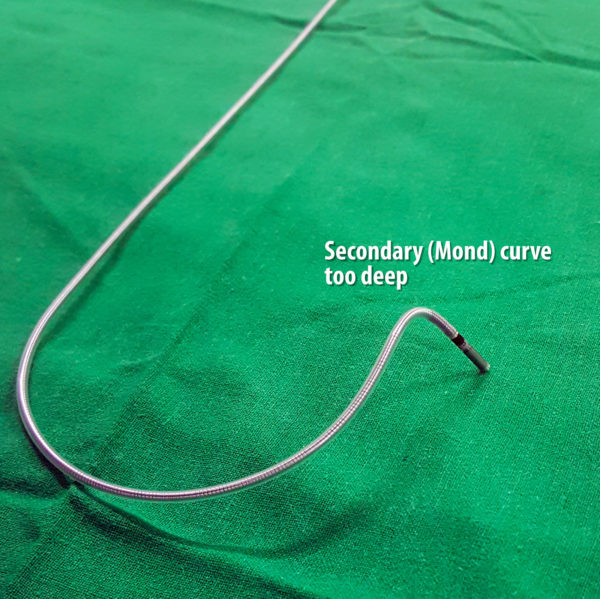
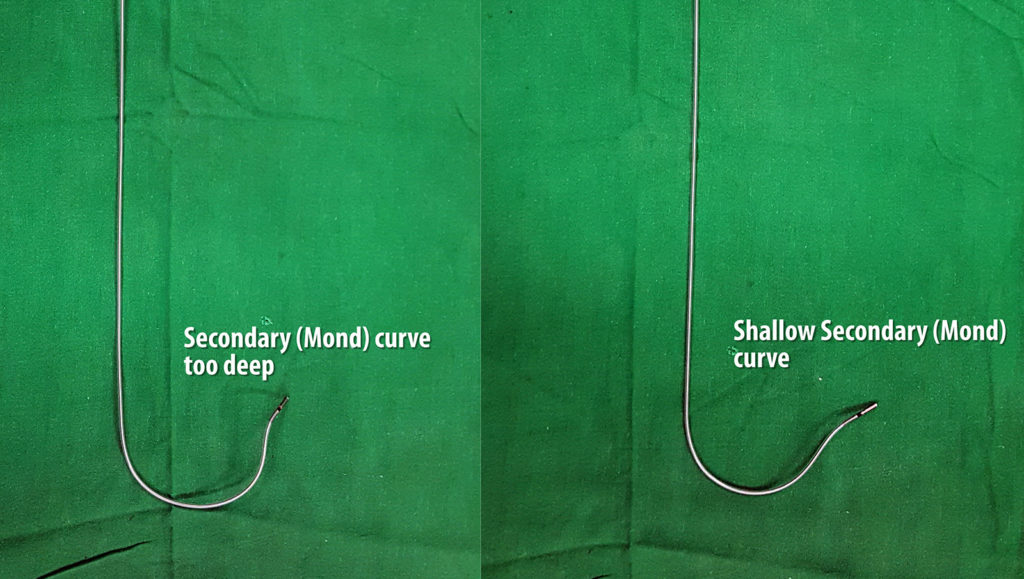
Figure : 3 Dimensional Stylet – Distal Curve : The distal curve facilitates septal implantation (i.e. directs the lead towards the septum – not free wall. This can be made to point the lead perpendicular (1) to the septum or make the lead wedge in obliquely (2) to the septum. The authors’s current approach is the oblique one – see figure below and text as to why
Figure : Deep distal curve. Note how the distal curve would place the lead tip almost perpendicular to the septum. Although this looks nice on LAO radiography while implanting, once the stylet comes out, the tip just hangs by it’s screw. A more shallow curve would wedge the lead obliquely rather than perpendicular – which means there is more tissue to hold the lead tip in place.
Figure : Two forms of distal curves – The plane of the distal curve “aka the Mond” can be made to be perpendicular or parallel to the primary curve (see image above). The perpendicular variety favors perpendicular implantation and the other form favors wedge (oblique) implantation to the septal myocardium. Author now prefers the second form as oblique implantation may favor better electrical contact with the muscle and more lead stability (see section below on LAO positioning)
Video : Creation of the 3 Dimensional Stylet : The stylet has two curves – large curve and small curve. The large curve facilitates crossing of the tricuspid valve and small distal curve facilitates septal pacing. All curves should be made without kinking (acute bends) the stylet as kinks (even if they are subsequently straitened out) will impair the smooth gliding of the lead over the stylet
Inserting the lead through the sheath
Once you are ready with a curved stylet, the lead implantation can begin. The foremost step is the insertion of the lead via the sheath. For this, the sheath dilator and guide-wire are gently pulled out and the lead is inserted through the lumen of the sheath.The lead should go in about 1/3 of its length without any resistance but its always better to check furoscopically as to where the lead is. It is very important that the lead be advanced slowly and not forcibly.
Never pull out the guidewire blindly (without looking through fluro) if there is a temporary pacing wire giving critical pacing support. The distal curved part of the guide-wire can get entangled in the temporary wire and dislodge it from the RV leading to loss of capture.
Video : Removal of guide-wire and insertion of lead through sheath. Important steps are to prevent air suction and to insert gently without force and using fluroscopy.
One potential place where brisk forcible insertion might cause problems is the SVC free wall: If the sheath is too much in, the tip will lie against the free wall of the SVC and the lead coming out of it will impinge on the wall creating a resistance. Therefore it is imperative that fluroscopic screening is done at the slightest resistance without pushing the lead blindly. If impinging, the whole sheath should be slightly withdrawn and the lead marched forward with about inch of stylet pulled out to make it floppy and fall down
Figure : Precautionary measure when inserting lead – It important to check the sheath tip position and insert the lead. If there is resistance, fluroscopy is essential before advancing the lead (see text)
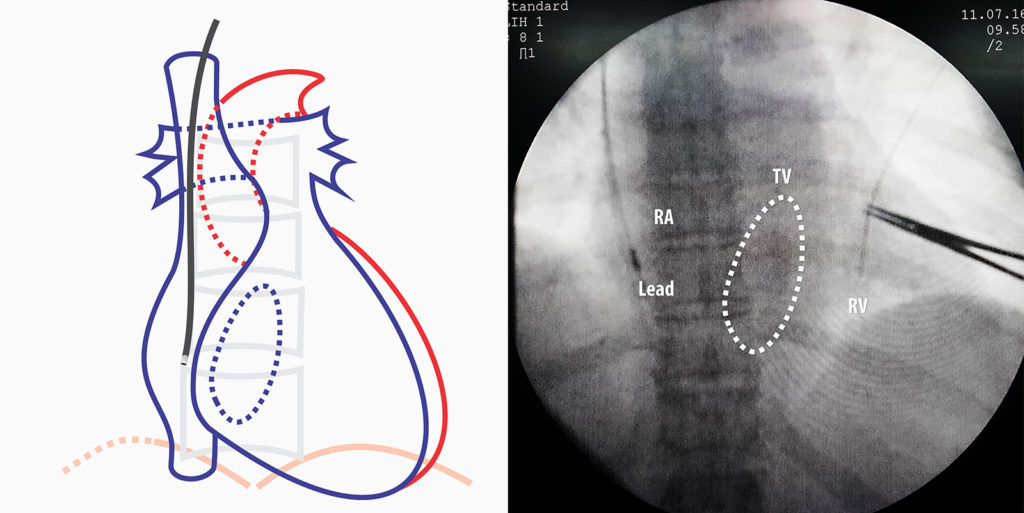
Figure : Lead parked in RA – Next step is to remove the straight stylet and insert the 3D stylet [ The artery forceps seen on right side of the image is a clip applied to the second guide wire and the drape to keep it in place – this example was taken form a dual chamber system implantation]
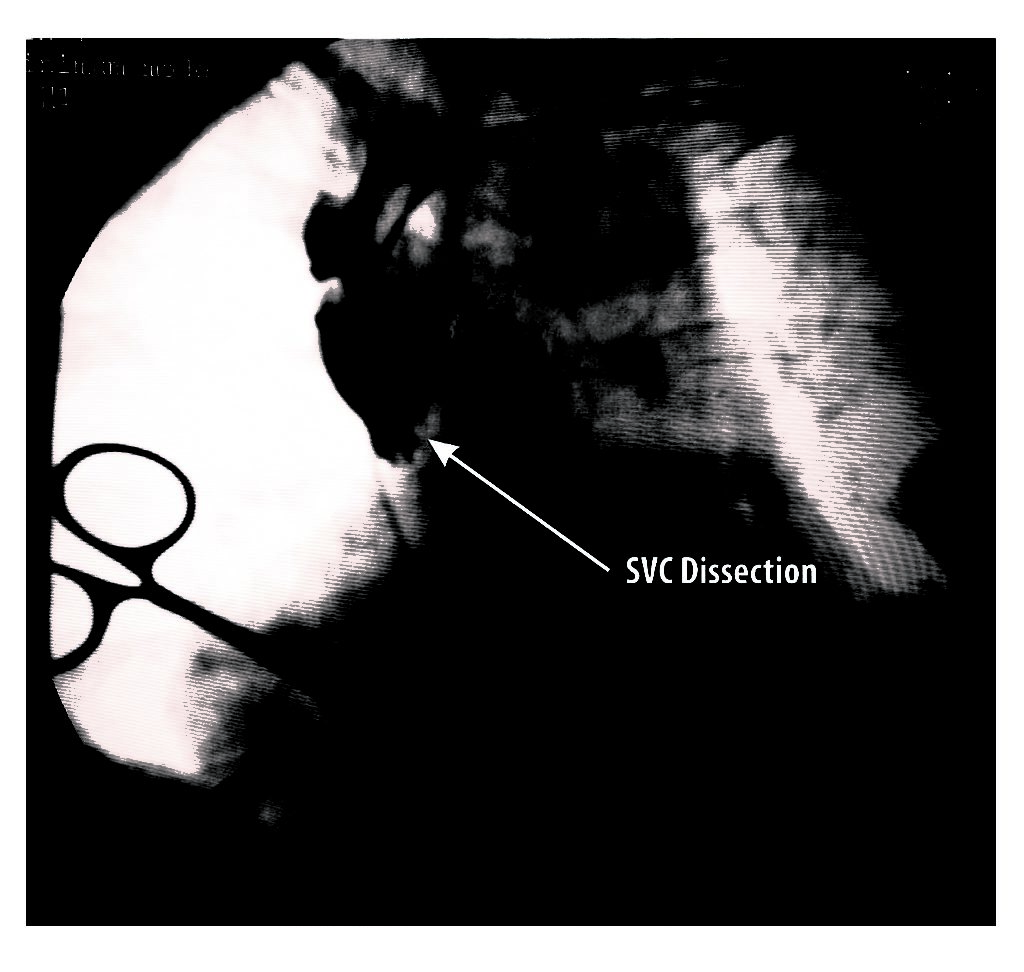
Figure : Complication of lead insertion – This patient was supposed to have an upgrade to dual chamber pacing. (She was already on a AAI pacemaker). After vascular access, although the guide wire went in easily, the lead was struggling at the SVC / RA junction. After some overzealous attempts, the new lead was seen to get “stuck”. This lead was carefully removed and contrast was injected through the sheath which revealed the frightening sight of a potential SVC dissection. Fortunately, it resolved on its own and the procedure was abandoned for a future date pending detailed vascular assessment.
Crossing the Tricuspid Valve
After parking the lead in the RA, the straight stylet is withdrawn and the curved 3D stylet is inserted. One must keep hands free of blood and the stylets wet with heparinized saline during stylet exchanges. With the 3D stylet fully in, now the whole stylet – lead assembly is advanced in an attempt to cross the tricuspid valve. Most of the time with the assistance of the large curve of the stylet, the lead crosses the valve. The stiffness of the stylet determines the large curve and if the lead is heavy (e.g. an ICD lead) or the stylet is soft the curve may open up when inside the heart – impeding crossing. In such situation, the large curve has to be made more acute or a stiffer stylet has to be used. Monitoring the ECG is helpful as when the lead seems to enter the RV, occurrence ventricular ectopics confirm that the lead is indeed in the RV
Figure : Crossing the tricuspid valve directly (with the 3D stylet inside) – The large curve of the stylet facilitates tricuspid crossing. Note how the primary curve has opened up from the weight of the lead. Therefore when shaping the stylet pay attention to the target lead and strength of the stylet to decide on the primary curvature
Occasionally though the lead fails to cross the valve and one must resort to various tricks to cross the valve. It’s a fine balance between the floppiness of the lead and the support given by the stylet. If one withdraws the stylet one or two inches the lead tip segment becomes floppy enabling it to be “wriggled” in through the valve. The core principle is to not push the lead forcibly with the stylet fully inside in it – especially when the lead is impinging on an undetermined obstacle
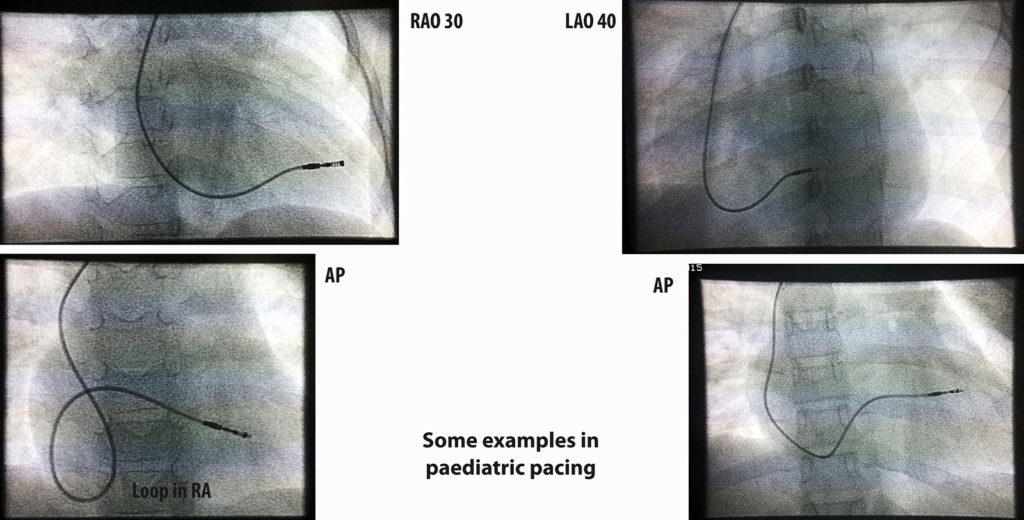
A popular method to use in case of a difficult to cross valve is the looping method : For this the 3D stylet is withdrawn and a straight stylet with a gentle curve is inserted all the way but 2 to 3 inches short of reaching the lead tip thus keeping that part floppy. The lead is advanced and when it gets entangled in the valve, the stylet is further withdrawn and the lead is further advanced thus creating a loop (see image below). Once a large loop is formed in the RV inlet the stylet is slowly advanced, which ultimately straightens out the lead inside the RV
Video : Insertion of curved 3D stylet
Placing in the Mid-septal Position
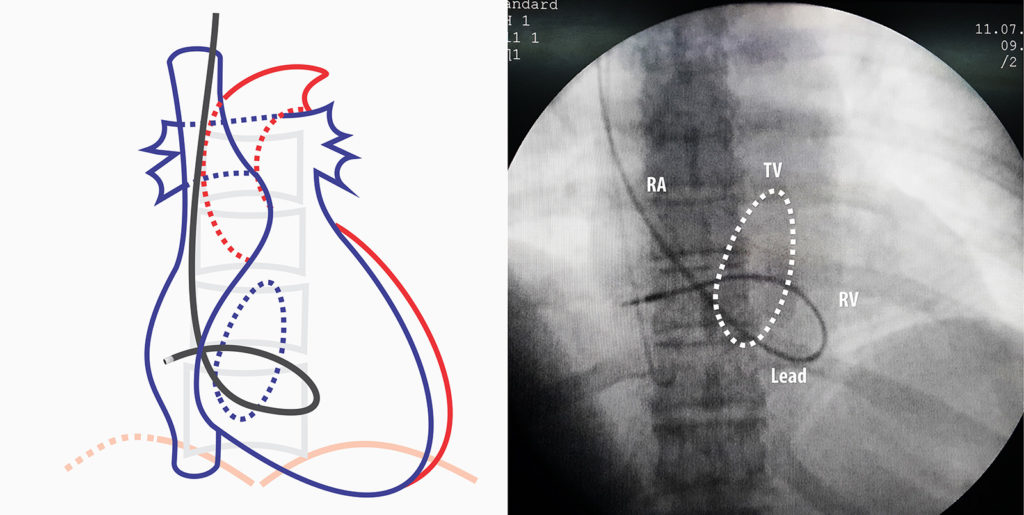
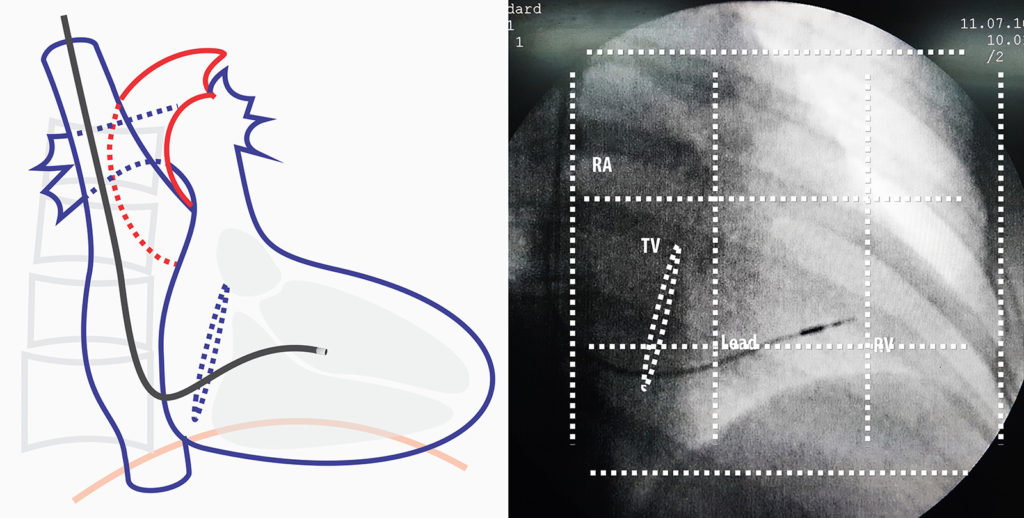
In AP projection the RV free wall is most anterior and the septum lies behind it with RV cavity separating the two. Because of the oblique rotation of the heart, it is necessary to appreciate that the inter-ventricular septum seen in AP projection is actually foreshortened and one cannot get an accurate idea of the distance from the tricuspid valve to the Apex (i. e. the horizontal length of the septum) – Therefore we need the right – anterior – oblique (RAO) view to get an idea of the true longitudinal width of the inter-ventricular septum. At RAO 30 degrees, the shadow that we see is a good projection of the septum. Therefore the mid-septal position where we place the lead is decided while viewing in RAO 30.
Determination of Optimal Site : First is to use fluoroscopy. In this technique, one divides the RAO cardiac shadow in to three equal vertical and three horizontal sections. The horizontal sections are produced by dividing from the spinal edge to lateral cardiac border (apex). The vertical sections are divided by taking the upper and lower limits of the cardiac shadow. The following diagrams illustrate these sections. The optimal radiographic site is the middle third in both directions.
Figure – RAO 30 degrees view. The dotted lines represent imaginary lines dividing the septum into 9 parts and the center is the radiographic mid-septal position. (see text). Electrical fine-tuning (getting the narrowest upright QRS complex) determines the final position
With experience, the marking can be done mentally with eye balled limits but out of the boundaries, upper and lower limits are the most variable as diaphragmatic shadow can obscure inferior cardiac border. Anatomical variations and body habitus also play a role.
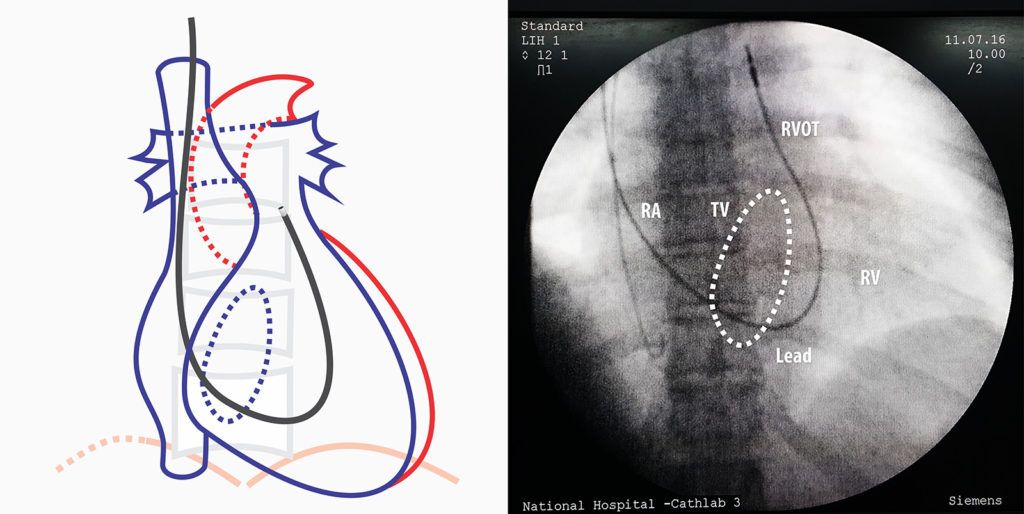
At times, it is difficult to get to the mid septal position as the lead tends to gravitate into the apex. In such instances, the RVOT drop-down method can be utilized facilitate septal positioning. With the straight stylet almost halfway withdrawn, the operator can try to wriggle the floppy lead into the right ventricular outflow tract (which is aided by the blood flow). Once well in the RVOT, the straight stylet is exchanged with the 3D stylet and the lead is slowly withdrawn under fluroscopy until the tip “drops” to the septum.
Figure : Lead placed in RVOT – The floppy lead is navigated well into the RVOT with the aid of the blood flow
Figure : RVOT drop down – Thereafter, the 3D stylet is inserted and the lead is slowly until it “drops down ” to the desired position
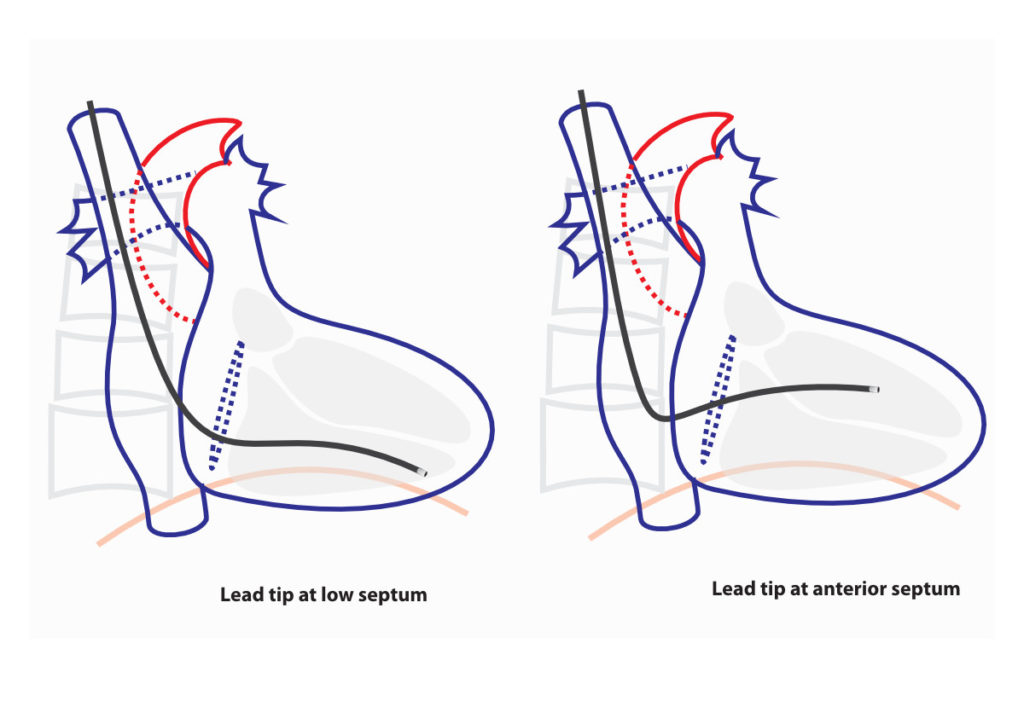
In certain situations, low septal pacing may be better than mid septal pacing. The apical location has one undeniable benefit – lead stability. Generally an apical lead does not slip out and is very stable – which may be a consideration where critical pacing is necessary (e.g. elderly patient with life threatening complete heart block) more than “physiologic pacing”. Septal leads have a relatively higher chance of early dislodgement and therefore the author’s current practice (after some bad experience !!) is to pace the low anterior septum in elderly or otherwise frail patients whose rhythm is totally dependent on pacing.
The second situation where low septal pacing is preferred over mid septal, is when implanting ICD leads. If there is no long-term pacing need its better to implant in low septum as ICD leads are heavy and hence prone to more early dislodgement. It is also assumed that low septal position give more coverage for the shocking vector of the RV coil. However in CRTDs, mid-septal pacing may provide better axis separation for optimal CRT response compared to low septal position.
Figure : RAO 30 degrees view – Optional Sites . In certain situations these locations can be used. The low septum is particularly useful for ICD leads and in situations where lead stability is of critical importance (see text).
At times, anterior septum is better electrically rather than mid-septal position. Occasionally, despite good radiographic position – one finds that the QRS complex is not narrow (aka ugly !) in the mid septum. Electrical mapping may show that the best site is way more anterior in the septum. If this is the case, that location should be chosen.
However one must be not too anterior on the RAO view – because if too anterior, the lead may be actually placed in the wedge between the septum and the anterior wall. This is similar to placing the lead in the free wall and the author has seen a case where the lead had perforated out at the anterior edge (confirmed by CT scan). Therefore it is essential that the lead position be checked on RAO 30 view to ensure that it is not in the anterior septum.
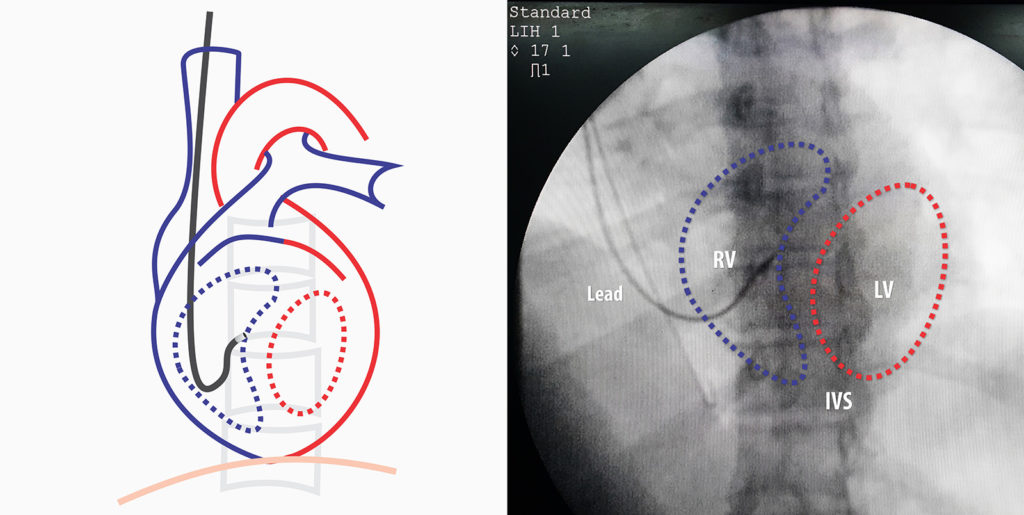
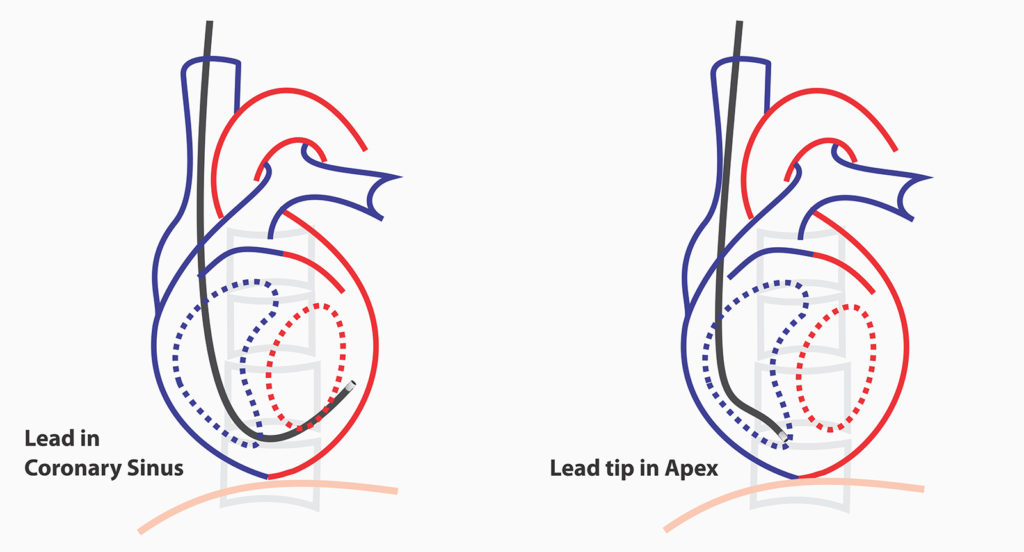
The limitation of RAO view is that one has no idea actually whether the lead tip (pointed by the second curve of the stylet) is actually facing the septum or the RV free wall. Although the paced ECG morphology would indicate a free wall position, this may not be the actual case and we need to verify that it’s indeed pointing to the septum – for this the, left anterior oblique view (LAO) at 40 degree view helps. In LAO projection, we are looking end on from the cardiac apex and on the right side lies the RV cavity and the left side lies the LV cavity along with the septum in between at the vertical midline.
As demonstrated above, if the tip is apposed against the mid-line, then we are sure that it’s pacing the septum – not the free wall. Its best practice to confirm this view before deploying the active fix screw as a free wall fix can lead to a perforation. If the lead is seen taking curve along the inferior aspect of the cardiac silhouette (crossing the mid-line), then it has gone in to the coronary sinus and needs re-positioning.
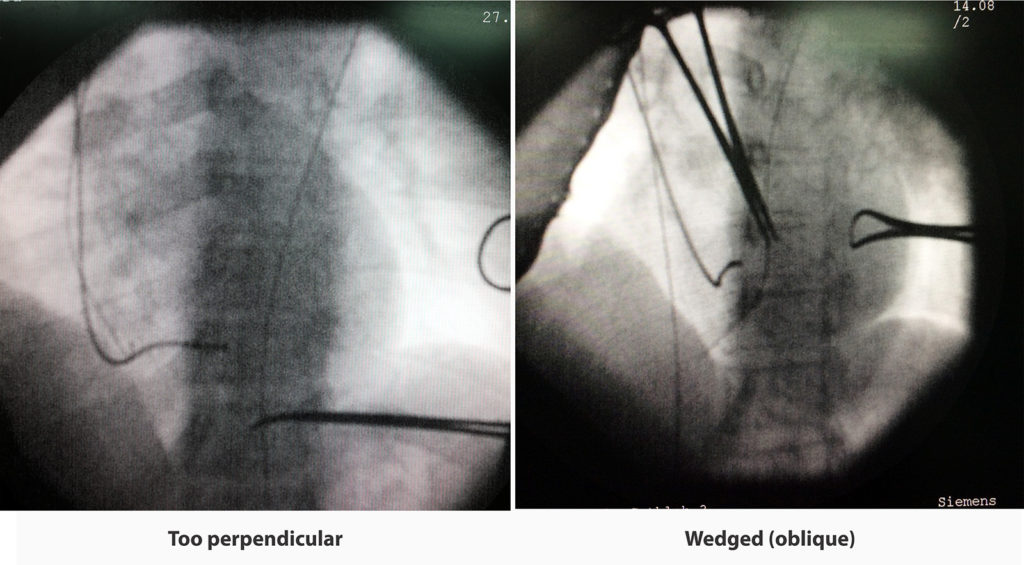
The other thing to consider in LAO projection is the acuteness of the lead to the septum (i.e. perpendicular vs oblique). Oblique appearance suggest wedged attachment to the septal muscle. Wedging offers more lead stability which is the achillies heel of septal pacing. In perpendicular attachment, the lead is basically attached only at the screw.and may be hanging down form it. However, this positioning is decided by the second curve of the sylet and its impossible to adjust this while the lead is being positioned. Due to these reasons, the distal curve of the sytlet is now made to a gentle curve that facilitates wedging.
Figure : Fluroscopic appearance of septal implantation – 1. Too perpendicular attachment 2. Wedged (oblique attachment) – Note that in the second situation it necessary to check in RAO as this position may also infer an anterior wall fixation
Figure : Stylet distal (second) curves – 1. Favors perpendicular implantation 2. Favors wedged (oblique implantation)
Video : Re-cap – Checking of Lead Parameters ( see here for a description on basic lead parameter check)
Once the lead is in place one must pace and see the electrical result too – because certain ECG features are desirable for optimal pacing. Things to look for are the QRS width and QRS height / directionality in limb leads. Ideal paced QRS should be narrow as possible (looks similar to the native QRS if there is no bundle branch block) and should be upright in Leads I, II. Achieving a narrow upright QRS in lead I may be difficult due to intra myocardial LV activation in septal pacing. However II and aVF should be narrow without difficulty and should have dominant R waves. If these two leads do not have dominant R Waves (i.e. predominantly upright QRS), the lead should be re-positioned at a higher position to achieve such as the lead may be too low and close to the inferior cardiac border. All re-positioning should be done in RAO view for optimal positioning and LAO confirmed before the screw is deployed. Upright QRS indicates top-down activation of the ventricles, similar to native conduction and a narrow QRS indicates that inter-ventricular delay is minimal.
Despite optimal limb lead QRS complex, most of the time the precordial leads do show some hint of LBBB. This is because the although septal, the initial activation is from the RV. However this LBBB like look is very narrow when compared with the ugly LBBB resulting from apical pacing.
Once radiographically and electrically satisfactory result has been achieved, the active fix screw should be deployed to fix the lead. For details on testing lead parameters please see here
Deployment of Active Fixation
Active fix lead deployment must be done meticulously and not hurried. The screw in mechanism must enter the myocardium in a similar fashion that a cork screw enters the cork.
If one tests the screwing mechanism in vitro, it would be noted that the screw abruptly comes out after few rotations and therefore if deployed rapidly, the screw will stab into the myocardium – not screw in. Stabbing will lead to more tissue damage and may increase chance of short term lead dislodgment. Another pointer is that over-screwing also must be avoided as once the screw comes out, it achieves a relatively fixed length – it does not keep on lengthening. In standard leads this is occurs about after 10-15 turns. Over-screwing builds up torque in the screw which is released in the opposite direction when the screwing clip is released – this increases the chance of lead dislodgement.
When deploying the screw it is best practice to count the number of turns and screw in gently. The externally visible portion of the lead should be kept straight as the torque to the tip is transmitted via a helical coil – not a rigid tube. 1 to 1 transmission of torque may not occur if the lead is tangled or kinked
If the fluoroscopic system supports high magnification, one can visualize the screw being deployed but it’s not a must if you count the number of turns. The recommended number of turns for a RV lead is 10-15 but depends on the lead manufacturer.
Once the screw has been deployed, the curved stylet can be taken out. The stylet should be gently but firmly pulled out – rapid pull must be avoided as that may dislodge the lead. Removal of the stylet should be done under continuous fluroscopy as the wriggling movement of the lead during pull out is a surrogate marker for lead stability.
Thereafter a straight stylet is placed in halfway along the lead. It’s imperative that only half of the stylet is put it – if full length is inserted, the distal part of the lead may straighten out and get dislodged. The sole propose of this stylet is to provide support of lead anchorage at the pocket.
With the straight stylet is in place, the parameters are checked again for confirmation. Once the parameters are deemed suitable, the peel-away sheath can be now removed by pulling apart from its two “ears”.
Video : Active fixation of lead – Note how the lead is held straight during fixation and the counted rotations of the screw. (The screw attaches to the lead end with a snap). This is an instance where an assistant is invaluable – if no assistant is available, one has to rely on the stylet to keep the lead straight. Keeping the lead straight facilitates 1 : 1 transmission of torque. A tiny push (1 – 2 mm) once 10 rotations are complete helps embedding the screw into the myocardium. Brief glance of fluoroscopy is recommended to view the tip position and screw deployment. Thereafter the curved stylet is removed firmly but slowly under fluro, while observing the dangling movement of the lead. Static location of the lead tip despite dangling confirms good fixation. Once the curved stylet is out, a straight sytlet is inserted halfway into the lead. The role of this stylet is to provide stiffness to the vascular part of the lead to facilitate removal of the sheath and anchor the lead. It should not be sent in too much as it will straighten out the intra-cardiac part of the lead and cause a dislodgement.
Video : Peel-away of sheath – Sheath peel away must be done as demonstrated to prevent a vascular tear while keeping the lead in place. When pulling from the “ears” of the sheath, the split on the shaft of the sheath may extend into the vein and tear the vein – therefore splitting point on the shaft must be visible externally. This can be done by slowly withdrawing the sheath as you peel away. The lead must be held in place with a finger while the sheath is – withdrawn.
Video : Peel-away of sheath – of RV lead in a dual chamber system. – similar to above
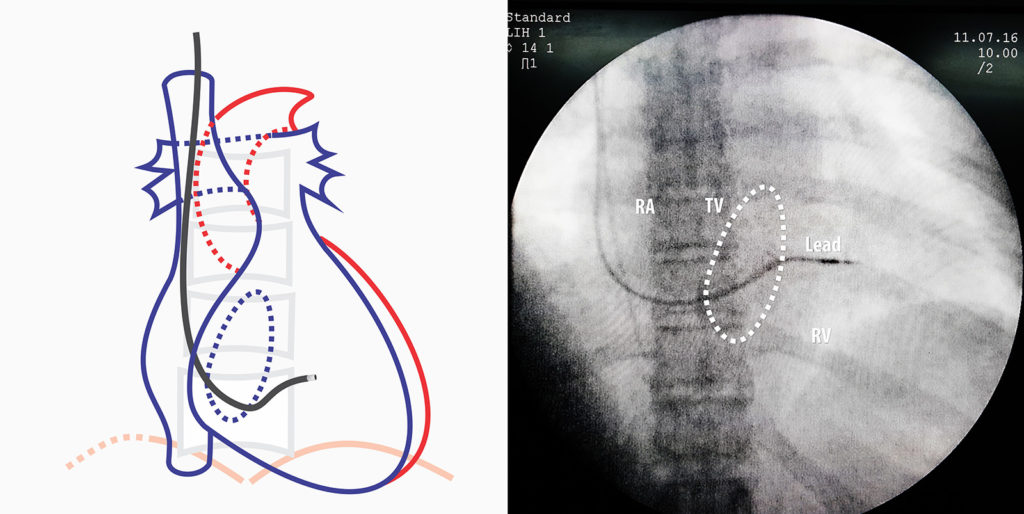
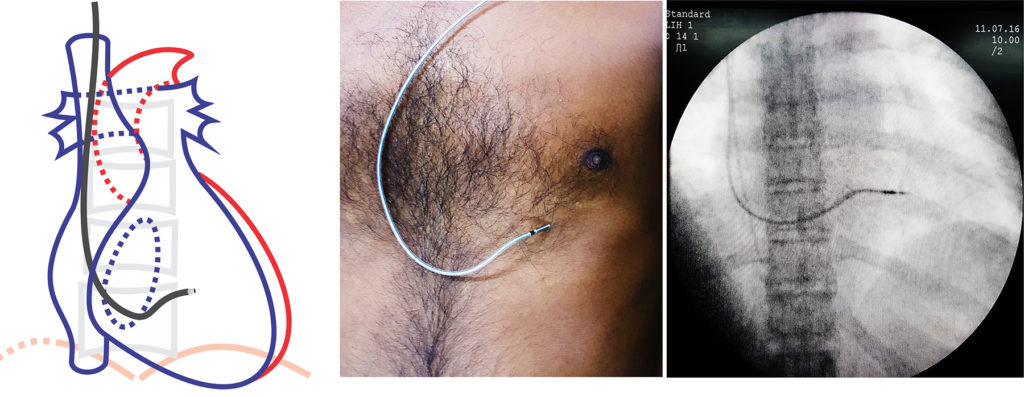
Figure – Final position of RV lead in AP view. Note the gentle curve (loop) of lead left in RA – this prevents tension on the lead tip that may occur when upper limb movements occur. It also gives some protection in case the lead sleeve loosens out.
Figure – Final position of RV lead in AP view. Note how a lead would appear if super imposed on the body as demonstrated on a model

